Monday, December 21, 2015

MAKE // Last Minute Hand Stamped Gift Wrap

DSC_0777

During the summer, Patrick and I needed to wrap a wedding gift for his cousin but didn't like any of the paper we found. We were shopping at Paper Source and found the cutest tandem bicycle stamp instead. Patrick suggested that we make our own wrapping paper using the cute stamp and very fancy bronze ink. So fun! I can only hope that my craftiness is contagious.

In my previous gift wrap post, I told you that we're trying to use the things we have this Christmas so we won't have to move half used rolls of wrapping paper in the spring. Naturally, that means using as many of our giant rolls of kraft paper as possible.

DSC_0765

I bought this stamp on a crafter's binge at Home Made in the summer, I think. Even then, I couldn't resist the little Dala horse--or the 50% off price tag. I really love the aesthetic of Yellow Owl Workshop stamps! Kind of rustic and crude, the hand carved look is so dreamy.

DSC_0766

This is the perfect last minute wrapping idea. We cut the paper first, so we wouldn't waste ink or time, and quickly stamped out a repeating pattern with two stamps in the kit.

DSC_0769

Patrick gave me these typeset letters last year, and I am so excited to use them for gift tags. I like that I'm not great at lining the letters up. It adds a quirky handmade touch that I know Zooey Deschanel would approve of.

DSC_0772

In this house we always have both a ton of brown paper and plenty of baker's twine, so they're kind of a natural pairing around here. Someone on Instagram suggested that my next book should be called "101 Uses for Baker's Twine" and they're probably right.

XO
Robbie

DRINK // Chai Spiced + Port Spiked Eggnog

DSC_0919

This December I've spent a lot of time thinking about how anyone living in a southern state is able to celebrate Christmas. It's currently 65 degrees in New Jersey, and I can't bring myself to listen to White Christmas or Baby, It's Cold Outside. It feels like a lie. I don't even need a white Christmas at this point; I'll take anything below 50 degrees! My solution to the problem is to fill this month with my favorite Christmas traditions. If I drink enough eggnog, maybe I'll be able to fool myself into thinking its cold.

DSC_0866

As a kid I drank so much eggnog. For a while it was the Christmas ritual I looked forward to the most, but back then it was just the out of the carton variety. A few years ago I learned to make it from scratch, and now I don't want anything else. Making it at home also let me have fun with the flavors (and booze) that I added. I chose to spike this chai eggnog with a tawny port for a few reasons. I love it but a lot of people don't know that it exists; it is slightly fruity but intensely oaky; its lower in alcohol content that bourbon, so you don't need to worry (much) about getting everyone drunk on Christmas.

DSC_0898

Chai-spiced, Port-spiked Eggnog:
1/2 cup chai tea
2 cups milk
2 cups heavy cream
1/4 cup of light brown sugar
6 eggs, separated
1/3 cup of white sugar
1 1/2 cups of 10 year old Tawny Port (for less fruit and more oak, try a 20 year old!)

In a saucepan toast the chai tea over medium heat until fragrant. Add the milk and cream. Bring the mixture to a boil, then turn off the heat and allow to stand for ten minutes. In a bowl whisk the egg yolks and brown sugar until completely incorporated. Strain the chai tea from the milk, and then slowly  add the warm milk to the eggs, tempering them. Warm the port in a saucepan and whisk it into the eggnog. In a stand mixer, whisk the egg whites until foamy. Then gradually add the white sugar and continue to whisk until firm peaks form. Fold the meringue into the eggnog, and serve warm.

Enjoy!
Pat XO

Saturday, December 19, 2015

BAKE // Friends & Fruitcake

DSC_0836

After a very stressful few weeks, I can finally breathe a sigh of relief. After turning down two other schools, and waiting half an eternity, I heard from my top choice graduate school. I'll be going to get my Master's degree next fall! It was difficult to get excited about Christmas with the threat of being turned down looming over me, but now I want to listen to all of my Christmas records on repeat. At my most stressed, I used baking fruitcakes, which are a surprisingly labor intensive treat, as an exercise in gratitude.

DSC_0769

Before this year I had never actually tasted a fruitcake. I had always thought there were bricks speckled with unnaturally colorful fruit. Christmas is my favorite time to bake and cook, but I have never thought to make on before this year. What inspired me was an article in the magazine Taproot. In it a family (hesitantly) uses these cakes to get to know their new neighbors, and are pleasantly surprised by the reaction. The story inspired me to make my own variation of their fruitcakes for the people in my life I am most grateful for. This year I have been lucky enough to become friends with some amazing people, and I was excited to share this with them.

DSC_0794

SNAP Fruitcake:
1 1/2 lb dried figs
1/2 lb golden raisins
1/2 lb dried pear
1/2 lb candied orange peel
1/2 lb pecans
1/4 lb pine nuts
3/4 cup of Art in the Age Snap liquor (if you can't find this, use a combination of Grand Marnier and bourbon)
1/2 lb butter
1/2 lb light brown sugar
6 eggs separated
2 cups of all purpose flour
1/2 tsp salt
1 tsp cinnamon
1 tsp cloves
1 tsp mace
1/2 tsp allspice
1/2 tsp nutmeg
1/2 cup milk
1/2 cup of Snap liquor for brushing the cakes with

Dice the figs, pears. and orange peels until roughly the size of the raisins. Mix all of the dried fruit with the nuts and pour the liquor over the mixture and let rest for twelve hours.

Preheat the oven to 250 degrees F. In a stand mixer, cream the butter and sugar together on medium. Add the egg yolks one at a time. On the lowest speed, add the flour and spices. Once everything is mixed together, add a cup of your dried fruit and nuts to start. Add the remaining dried fruit by hand (don't put your mixer through the stress of mixing all of the fruit in). Whisk egg whites until they hold firm peaks, and then fold into the batter.

Line four 6" round cake pans with parchment paper and divide the batter between them evenly. Brush the tops of the cakes with milk, and then bake for 2 1/2 hours, or until a toothpick comes out clean. Cool on a wire rack before removing the parchment paper. Brush with more liquor before serving. To store or ship, wrap the cakes in liquor soaked cheesecloth and then again in plastic wrap.

Enjoy!
Pat

Sunday, November 29, 2015

MAKE // Gilded Wrapping Paper

DSC_0756 DSC_0763 DSC_0767

Growing up, my grandparents alway put so much care into wrapping our families gifts. We each had our own wrapping paper, complete with matching bows and carefully written gift tags. The gifts were always wrapped well in advance and sometimes even put under the tree a few days early.
I've always admired my grandmothers attention to detail, and my grandfathers eagerness to maintain tradition. Whether it was brand new pajamas on Christmas eve or even the tiniest stocking stuffer, everything was wrapped with care.

I'm a firm believer in the notion that "it's the thought that counts" and I think that wrapping something nicely shows exactly how much you care about what you are giving. Additionally, as someone who often gives handmade gifts, I want my work to be taken seriously. Handing someone a hat I spent hours knitting wrapped in a plastic shopping bag really robs both the giver and recipient of the ceremony.

We plan on moving in the new year, so this will be a "use what you have" sort of holiday. We have rolls of brown paper that I use for just about everything, but wanted it to be a little more special for the holidays. This idea came Martha Stewart's very first Christmas book (in which 80% of the projects involve some sort of gold leaf). It's our very favorite holiday DIY book--probably because it features her Turkey Hill Farm so much--and I have been dying to try this.

I used Martha Stewart Liquid Gold Gilding and splattered it on to a precut piece of kraft paper. The liquid gild isn't cheap, so I made sure not to waste any.  At first, I really didn't like the aesthetic but once it dried and the gift was wrapped, I was really happy with it. I'll definitely do a few more this way.

Do you have any gift wrapping traditions? Have you ever designed your own wrapping paper?

XO
Robbie

Monday, November 16, 2015

LISTEN // Caleb Groh "Let It Groh"


Caleb and I have been internet pals since the dawn of time--babies with hot glue guns and Flickr accounts. I watched him build such an exciting creative life across the expanse of social media. Christmas albums, felted animals, music videos; each thing even more amazing than the last. His album "Mammoth Moon" was forever on repeat until I lost my ipod a couple of years ago.

And now this.


Caleb Groh "Let It Groh" from Jordan Bellamy on Vimeo.

Such an inspiring guy! What are you listening to?

XO
Robbie

Wednesday, November 11, 2015

BAKE // Spiced Custard & Pear Tart

DSC_0806

Most of what I know about cooking has been taught to me by my mom, but almost none of that concerned baking. She prefers working with malleable dishes that she could be more spontaneous with; the more exact science of baking never appealed to her. The only time I could count on her to bake was at Thanksgiving, when she would make apple pie. Every year I volunteered to help so that I could steal brown sugar coated apples while I waited for dinner.

My mom, like me, is always disappointed by Thanksgiving dinner. When she cooked Thanksgiving dinner, she hated being confined to the traditional dishes that people associate with the holiday. She thought it should have been an opportunity to be her most creative, but most of my family rallied for cranberry sauce out of a can. I realized this year that pies are the solution to this dilemma.

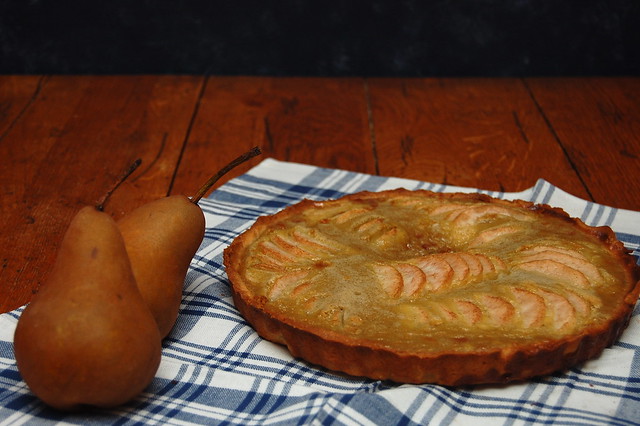
Most Thanksgiving dinners have at least two varieties of pie; any good Thanksgiving dinner will have at least three. Everyone will expect an apple and a pumpkin pie, but the third pie can really be completely up to you. Have someone bring the apple and pumpkin pies or buy them at the store yourself, and be creative in making your third choice. This Thanksgiving I decided to make a tart instead, featuring autumn's unsung hero, the pear.

DSC_0787

Pear Tart with Spiced Custard
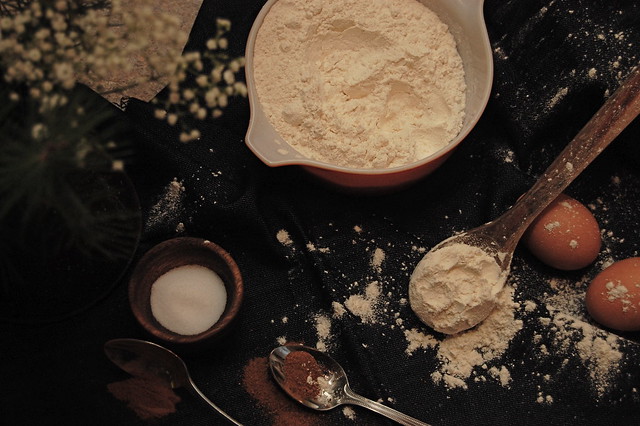
for the tart crust:

1/3 cup of white sugar
11 tablespoons of unsalted butter
1 egg
1 1/3 cups of flour
1/2 teaspoon of salt

for the filling

11 egg yolks
1/2 cup of sugar
2 cups of heavy cream
1 vanilla bean, seeded
zest of 1/2 a grapefruit
1 teaspoon of cinnamon
1/4 teaspoon of allspice
1/4 teaspoon of ginger
1/4 teaspoon of clove
5 bosc pears, halved, cored and cut widthwise into 1/4 inch slices

for the glaze

honey
water

1. Preheat the oven to 350 degrees

2. In a stand mixer with a paddle attachment, cream the sugar and butter for the crust on medium speed until it is a pale yellow color. Add the egg a mix until incorporated. Turn off the mixer and add all of the flour and salt. Starting on the lowest speed, mix the flour into the butter until the dough has come together. Turn the dough onto a floured surface and work it into the shape of a disc then wrap dough in plastic wrap and refrigerate for 45 minutes.

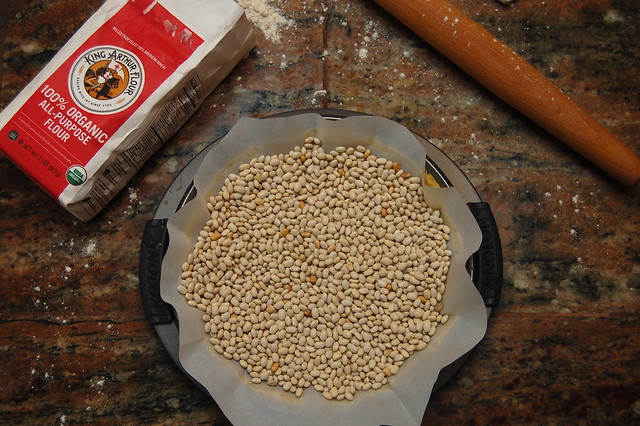
3. After 45 minutes, remove the dough from the refrigerator and roll it out 1/8 of an inch thick. Line a 9 inch tart pan with the dough and line the tart shell with parchment paper. Fill the lined tart shell with dry beans or pie weights and bake for 15 minutes. Remove from the oven and allow to cool.

4. Fill the tart shell with your pear slices. Fan the slices of each pear half together to maintain the distinct shape of each pear. Bake for 25 minutes.

5. While the pears bake, start the custard. Add the heavy cream to a saucepan with the vanilla bean seeds, grapefruit zest and all of the spices. Bring the mixture to a boil. Whisk the egg yolks and sugar together in a bowl. Slowly but gradually add the hot cream mixture to the eggs and sugar while constantly whisking until all of the cream has been incorporated  Adding too much cream at once, or not whisking will cause the eggs to scramble.

6.  Pour the custard over your pear slices, filling your tart. Bake for 30 minutes, or until the custard has set. While the tart bakes, mix honey with just enjoy water to give it a thin consistency. When your remove the tart, brush the honey gaze over the top of the tart. Allow to cool completely before serving.

Enjoy!

XO
Pat

Tuesday, November 3, 2015

DRINK // Snap and Cider

DSC_0832

November is my favorite month for so many reasons. The leaves are just barely hanging on to their branches, and their hues are at their most beautiful. The air is cold enough that I can start wearing my favorite cabled sweaters without hiding them under winter coats. I've finally have the time to make apple everything from pie to hard cider. In a few days we will celebrate Robbie's birthday, and in a few weeks it's also my birthday! Both followed by Thanksgiving. Conceptually I love this holiday; family and friends gather around for a cozy feast without any of the stress or expectations of Christmas, ensconced in gratitude. In reality the traditional Thanksgiving dinner is my least favorite holiday meal (give me an Easter ham any day). So this month, I've decided to share some recipes that I'll be using to make our Thanksgiving dinner a little more enjoyable. Feel free to use them to make yours even more enjoyable, if you're already enthusiastic about this meal.

DSC_0791

DSC_0803

I personally believe any great meal should start with a great cocktail. Whether you and your family sip on these while you cook, or you have one before you move to the dinner table, this is a great cocktail to start your autumnal feast. The base of the cocktail is Art in the Age's Snap liquor. At this point I've made it pretty clear that I'm obsessed with their products; I used Sage this past spring and Rhubarb in the summer. I've been dying to get my hands on Snap for quite a while, but I held off until it was more seasonally appropriate. Snap is distilled with all of the flavors of a traditional Pennsylvania Dutch ginger snap; molasses, ginger, cinnamon, vanilla, nutmeg and clove give this spirit a dark, spicy flavor.

DSC_0807

DSC_0818

The red wine float that tops this cocktail was as much an aesthetic choice as it was a decision about taste. I loved the plum red dissolving into burnt orange in a way that mimicked autumn foliage. Pinot Noirs from the Pacific Northwest work best for this cocktail. They tend to be smoky and spicy with flavors of dark stone fruits. Don't worry about all the extra wine left over, no one will turn it down on Thanksgiving.

DSC_0824

DSC_0830

Snap and Cider:
2 oz Snap
2.5 oz apple cider (unsweetened and with no spices)
1 oz red wine

Combine Snap and apple cider over ice and shake. Strain into a coupe. With a spoon face down over the glass, pour the red wine over the back of the spoon. This will spread the wine over the cocktail, lessening the impact and allowing it to float on top of the drink.

DSC_0826

Enjoy!

XO
Pat

Sunday, October 4, 2015

NESTING // AUTUMNAL APPLE & BEESWAX DIPPED LEAF GARLAND

DSC_0876

Last Christmas, almost all of our decorations could be divided into three groups; natural, heirloom or antique (these terms don't always go hand in hand). We made pomanders and a gingerbread house, I had a few older decorations from my grandparents, and we found a few little things at antique shops. We bought fresh garland and wreaths from a local tree farm.

Our home felt so warm and authentic (and so far removed from the plastic and glitter holidays I had become accustomed to) that I wanted to find a way to make the fall holidays feel the same. Gone are the days of battery operated flying bats and styrofoam pumpkins, we're ushering fall in with a much subtler hand.

It's not easy to find simple, natural decorating ideas. I almost gave up until I stumbled across some Waldorf School crafts on Pinterest (follow our fall board here). I even read the stories about the mama apple tree and it's babies full of stars. PURE MAGIC.

DSC_0755

We immediately agreed on a dried apple garland in homage of the apple tree story, and got to work right away.

DSC_0761

We alternated slicing some Red Delicious apples on the mandolin and dipping them into cinnamon. Unfortunately, I bought them hastily at the grocery store and they are our least favorite so not much snacking happened. We decided to make two garlands; one as a test and then the real thing and I'm glad we did. The first garland fell apart quickly, because I thought blanket stitching the super thin apple slices would be the best way to secure them. It wasn't. A simple box knot was the answer. I have a propensity to overcomplicate things.

DSC_0794

Once the apples were on the bakers twine, we decided the garland was a little anemic. I've been OBSESSED with Taproot magazine lately and remembered an article that mentioned dipping fall leaves in beeswax. (Of course, we have plenty from the failed teacup candles.) So, we wandered around the neighborhood foraging for pretty leaves.

DSC_0758

We brought them home, put on a Fleet Foxes record and melted the wax over a double boiler. The process was as simple as dipping the leaves into the hot wax and hanging them to dry. It didn't take any more than an hour.

DSC_0882

We've both been so very busy that I really enjoyed having some time to slow all the way down, enjoy nature and make something beautiful together.

XO
Robbie

Tuesday, September 29, 2015

GIVE // If You Continually Give, You Will Continually Have

DSC_0786

When I first started blogging, I felt so weird and lost and alone. I had a long list of hobbies that I was embarrassed to reveal in large groups. Things like knitting, holistic health and doing every from scratch seemed so difficult to explain to people, and when I did have the courage to bring something up, it was always met with adversity. ("You can buy a scarf instead of wasting your time knitting" or "If all of those herbs worked, modern medicine wouldn't exist") It was difficult to live as fully as I wanted.

But a few years of blogging has given me the confidence to embrace my realness. To live a life that's complete and full and even abundant. The reason? ALL OF YOU. You may not know, but you're my secret cheerleaders. I may wake up to an Instagram comment that not only brightens my day, but motivates me to do more. To be more. To be ME. I may get a Facebook message from someone I haven't seen in ages, explicitly cheering me on (even when their own life is hectic and overwhelming). I'm so grateful.

DSC_0778

As I dig out my own space, and you all bring your shovels and your smiles and support, things grow. Things are made. Unique, special things that are results of alchemy or collaboration.

Pat and I joke that we both have "internet best friends", but it's totally true.

Forest of The Rose Journals is one of those people. A few months ago, we agreed to a swap/barter situation after following each other of Instagram for a little while. He made me a beautiful fragrance with patchouli and vetiver and magic. It came so quickly and with a long handwritten letter. The was so much trust and authenticity in his gesture.

My end of our deal was that I would make him a scarf. I picked my very favorite yarn from my collection and a pattern that I have never knit before. It turns out that knitting a scarf out of sock yarn takes AGES. But he was patient.

This is what I sent him.

DSC_0772
PATTERN: CHEVRON SCARF / YARN: EIDOS THE VERDANT GRYPHON

This is what I learned:

-Be connected to the things you give, receive with gratitude.
-Not all friends need to live next door, your people are everywhere.

XO
Robbie


Thursday, September 10, 2015

NESTING // Beeswax Spoon Butter

DSC_0759

With Autumn approaching Robbie and I have enter full nesting mode. Our apartment has been filled with the smell of various pots of broth cooking away for hours, and Robbie has recovered the batch of pumpkin pie spices that had been lost to the back of the spice cabinet. Much to his chagrin, I still think its too early to pull on our cabled sweaters and play the Bright Eyes Christmas album (as I write this the temperature outside is 80 degrees).

One of the projects we've done to prepare for the colder months was treating all of our wooden cooking utensils and cutting boards with beeswax spoon butter. Sealing wooden utensils with spoon butter helps prevent future damage and fills in cracks where damage has already occurred. Wooden cutting boards and utensils are amazing investments, or in my case my favorite gifts, and this recipe will help preserve them season after season.

DSC_0765

For this recipe you will need a small saucepan, a glass jar (used to make and store your spoon butter), beeswax pellets and coconut oil. The amount of beeswax and coconut oil you will need depends on the size of the jar you use. The ratio you should follow is one part beeswax to 4 parts coconut oil, as a large amount of oil is needed to make the beeswax spreadable.

1. Add enough water to your saucepan so that when the jar is added, the water level is halfway up the height of the jar.
2. Add the jar filled with the coconut oil and beeswax to the water and warm up over medium heat.
3. Once the beeswax has melted, stir the mixture and remove from the heat, taking care not to burn yourself on the jar.
4. Allow the contents of the jar to cool until it is room temperature.

At this point you can use your spoon butter by taking a small amount and rubbing it on your utensils with a napkin or paper towel until it has a soft glossy finish. I highly recommend using this at the beginning of each season!

XO
Pat

DSC_0764

Wednesday, September 2, 2015

The Martha Project: C is for Candle // Teacup Candles

DSC_0826

These candles are adorable, right? We were both really excited to make them. Like more excited than both the shadow box and the sun-printed pillows. Mostly because they would make really great simple gifts. They had already had homes before we even started. one would go to one of our best internet friends, Brett and one to Patrick's mom. We spent a week scouring thrift shops and antique stores looking for the perfect teacups. I wanted something classic and simple, and Patrick was looking for something a little more whimsical.

Sometimes I feel fancier than Martha. I know. Is that even possible? It's not. SHE DOES ALL THINGS PERFECTLY AND HER DIRECTIONS (when followed exactly) ARE FLAWLESS. I saw that these candles called for melt & pour soy wax, but thought "We're so much better than that. We don't need melted phytoestrogens and vaporized GMOs floating around our home. We'll use organic beeswax and it will purify the air. We're so rustic and health conscious!"

DSC_0762 DSC_0796

And so we made a double boiler and a magical little autumnal spice blend, then melted the wax. No microwave or any sketchy shortcuts. It smelled beautiful and warm. Everyone would thank us for giving them candles that cleaned the air and improved all other aspects of their lives. These really were the most amazing candles.

But they weren't.

Apparently, all wicks are NOT created equal. The wicks burn MUCH faster than the wax. The candles burned themselves out in just few minutes.

We'll melt out the beeswax and use it for body care, and keep the teacups for fancy mornings.

DSC_0824

So, we learned a valuable lesson three crafts into The Martha Project: Martha knows best. Use the appropriate tools, follow the directions exactly, and always trust the queen. YASSS.

XO
Robbie

Friday, July 31, 2015

Cocktail: Boozy Cherry Milkshake

DSC_0869

DSC_0836

After a cherry picking adventure in Mullica Hill, our house has been full of tart cherries. Fresh tart cherries are difficult to procure, so I may have gotten a little overzealous. They are the best cherries to use for desserts, as they balance the sweetness of the rest of the dish. Instead of a pie or a tart, my mind immediately went to an alcholic milkshake. Oops!

DSC_0845

DSC_0846

I always see recipes for bourbon milkshakes floating around the internet, and I don't know why I haven't made one yet. If old fashioneds have taught me anything, it's that cherries and bourbon go well together. This milkshake only proved my theory.

DSC_0865

DSC_0886

As for ice cream, I went with Three Twins Madagascar Vanilla. I wish I could say I chose this because it was organic, but in reality I was drawn to the higher grade vanilla they used. If you can find this brand, I would definitely use it. If not, go for the ice cream you think will add the best vanilla flavor to your shake. I hope this milkshake helps you cool down on the hotter days of summer!

Boozy Cherry Milkshake:
1 pint vanilla ice cream
1/4 cup milk (feel free to add more to reach the desired thickness)
1 scant cup tart cherries
4 oz bourbon

Combine all ingredients in a blender, and blend until its is as smooth as you like. Split between two glasses. Garnish with skewered cherries. Enjoy!

XO
Pat and Robbie

DSC_0879

Wednesday, July 15, 2015

Classic Cocktail: Pimm's Cup

DSC_0882

DSC_0915

A common question I get as a bartender is "What is Pimm's?" Pimm's Cups appear on a lot of specialty cocktail lists, but its dark color and complex taste make this liqueur mysterious. Many popular liqueurs have single note flavors such as orange, ginger and elderflower. Pimm's, however, falls into a category of European liqueurs flavored with a secret blend of spices, fruits and herbs.

DSC_0886

DSC_0891

More specifically, Pimm's is one brand of fruit cup, which is a botanical flavored liqueur intended to be mixed with a fairly neutral mixer to make a light summery cocktail. Most fruit cups are gin based, and Pimm's No. 1 is no exception. If you aren't a fan of gin, you shouldn't let that fact scare you off from Pimm's; the strong juniper taste of gin that many find off putting is subdued in the flavoring process. At one point there were six varieties of Pimm's all with different base spirits, from rum to scotch, but the only varieties left are the classic gin based No. 1 and the vodka based No. 6, made in small amounts.

DSC_0894

DSC_0912

In England, Pimm's is held in the highest regard. The Pimm's Cup has become one of the most popular drinks to enjoy during the events that make up England's social season, such as the Henly Royal Regatta, Wimbledon, and the Chelsea Flower Show. Peerage is by no means a necessity to enjoy this drink; whether you're at a polo match, or enjoying a sunny day out back, you can easily mix you and your friends a few Pimm's Cups.

DSC_0920

DSC_0942

Alone Pimm's has a flavor similar to that of cola, so the most commonly used mixers tend to have light flavors to balance it. Sparkling lemonade, gingerale and sparkling wine are the most popular ones. Most fruits will serve as an acceptable garnish (blackberries and cucumbers are my personal favorite additions).

Robbie and I ventured out to enjoy an afternoon of reading classics and sipping on Pimm's Cups using my favorite recipe. Although I hope you enjoy my recipe, I'm interested to hear what all of you are using to make yours. Make sure to share your own creations with us!

Pimm's Cup:
2 oz Pimm's No. 1
Canada Dry Green Tea Gingerale
Sliced Cucumber

Fill a glass with ice and a handful of sliced cucumber. Add Pimm's and top with Green Tea Gingerale.

DSC_0924

Enjoy!

XO
Pat and Robbie