

Unlike Pat, I've went out of my way to make sure that I get to dye eggs every year. If that meant boiling eggs at 2am after a long night of studying or working, I still made sure it would happen. There are so many different ways to do it--and they all have varying degrees of difficulty and success. As a kid, I remember an intense apparatus that suspended the eggs so you could draw on them with water based markers and a very disappointing glitter kit that that produced sloppy, inedible eggs. (Do NOT think for a second that I'm anti-glitter. There's nothing further from the truth.)
Throughout this year, we've been experimenting with very folk-sy sorts of projects; cinnamon dough ornaments, sourdough bread, and beer (very shortly). I wanted to keep that rustic vibe alive by experimenting with naturally dyed eggs.
I used the Martha Stewart source as a primary resource, and expanded that knowledge with ideas from other blogs and trial-and-error. Some things went well, some did not. I've included a cross section of all of the methods we tried so you would be able to anticipate (or avoid) similar results.
EGGS:
I always use the Martha method, and it produces perfect eggs every time. I intend on eating a large majority of them, so they have to look palatable. Essentially, the eggs go into a pot of water with a little vinegar (the vinegar will help prepare the eggs for the dye). You bring the pot to a full (not rolling) boil and place the lid on top. Remove it from the heat and leave sit for 12 minutes. Move eggs into an ice bath, and you'll have perfect yellow yolks under those colorful shells.
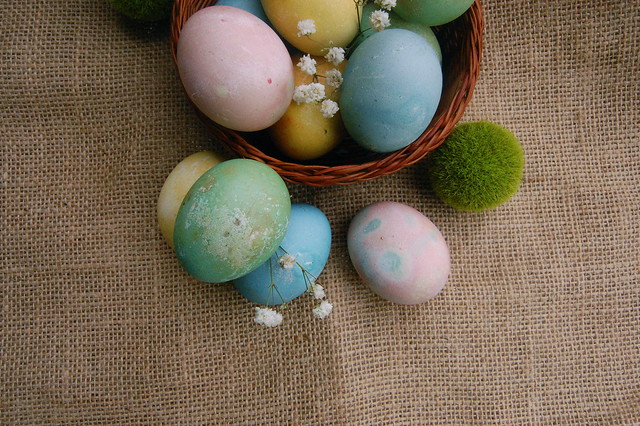
BLUE:
Blue was the easiest and prettiest color that we achieved. I shredded an entire head of red cabbage into a stock pot and covered it with roughly 8 cups of water and brought it to boil. I'm pretty sure I walked away after turning down the heat and forgot about it for at least half an hour. The darker the water, the better! your eggs will be a few shades lighter that the dye. (You can test the color by putting a few drops on a white plate.) Once the dye is ready, pop in your eggs! 15 minutes seemed like enough time to produce an amazing light blue!
PINK:
Another easy dye bath to prepare! Chop up around 3-4 beets. I didn't peel them or anything extreme. Just toss them in a pot with enough water to cover all of them. Cook them for the same amount of time, and put the eggs in once it cools a little. Again, 15 minutes should be efficient.
YELLOW:
Turmeric and water! You don't even have to cook it! Just make sure it is mixed well. Unfortunately, these eggs took quite a while. Leave them in the dye bath for at least 30 minutes. When the come out, the ground turmeric is going to have settled on the eggs. Wipe it off lightly.
GREEN:
Green didn't go as well as the other colors. After waiting the full 30 minutes for the yellow dye to set, the eggs was supposed to be placed in the blue for 5 seconds. 5 minutes was barely enough. Nothing in any directions said to let the eggs dry between baths, but i now find that suspect. If you look at the photo on the bottom you'll see that there were spots where the dyes did not work well together.
PURPLE:
You don't see any in the picture, do you? This was our least successful color. This was supposed to be achieved by placing a pink egg into the blue dye for 5 seconds. NOPE. We ended up with a handful of pink eggs with blue spots. It's okay if you know that going in--which you do now--but initially it was a little disappointing.
NOTES:
Different sites suggest different mordants, but we found that vinegar in each stage was more than enough. Finished eggs will look very matte--almost dusty--but, they can be polished with a paper towel and a little olive oil to make them look fresher and more photogenic.
I'm so glad that I was able to share one of my own personal traditions with Pat, and I can't wait to build on it and share it with our family in the future.
XO
Robbie